

TDS TV’s user interface is getting a whole new look.
Don’t worry, your DVR, on-screen guide and remote will still work the same as before. But visually, your TDS TV experience is going to another level.
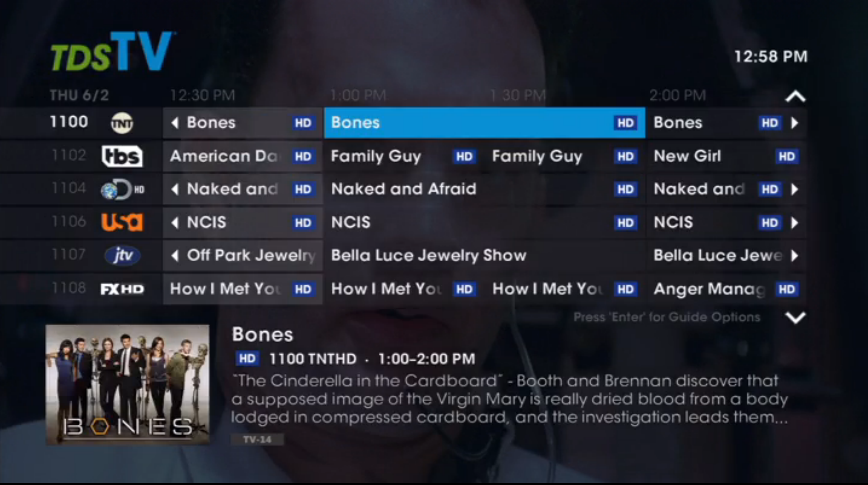
For example, your TV guide will now include each channel’s logo, making it easier and quicker to find your favorite networks. Also, when you’re looking through the updated guide, you’ll see posters of the movies and TV shows you highlight.
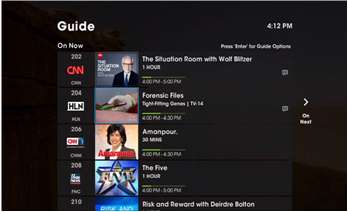
Another new feature is the ability just scan through shows that are currently airing by using the Guide.
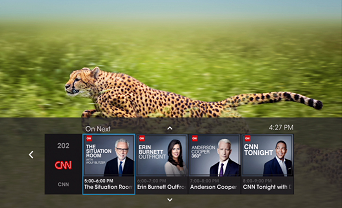
We’re also big fans of the updated Browse Panel. When you’re watching live TV and want to see what else is on—or coming on—use the UP or DOWN arrows on your remote to bring up the Browse Panel. You’ll be able to keep watching TV, but also see what’s on other channels now and in the future.
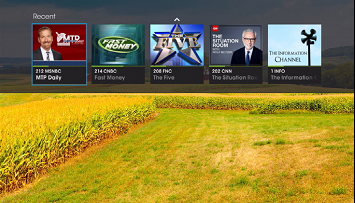
The new upgrade makes it easier than ever before to keep a handy list of your most recent viewed channels. With the new user interface you can bring up a panel of the last five channels you watched by pressing the LAST button on your remote.
But wait, there’s more! If you use the arrow buttons to highlight an option on this screen, you’ll see what’s on that channel live, right now this second. This means you’ll always be able to flip between channels and catch what you want to watch.
Not a fan of your new on-screen guide? Not a problem. Follow these instructions to try out other guide views:
- Press MENU on your remote control.
- Press the DOWN ARROW to select Settings on the Main Menu, and then press OK.
- Select Television, and then press OK.
- Select Primary Guide Style, and then press OK.
- Select Guide Rotation, and then press OK.
- For each guide you want to include in the rotation, select the check box and then press OK. A check mark in the check box includes the guide in the rotation.
- Select Save, then press OK to save the guide rotation settings.
- Select Save, then press OK to exit.
You will automatically see these upgrades to your interface in the next few days. If for some reason they don’t appear, or your set-top box becomes stuck on the TDS screen, reboot your system by:
- Pressing the MENU button on your remote control.
- Choose “Settings.”
- Select “Restart System.”
If you’re not able to perform the above reboot, try the following options:
Option 1: Hold down the power button on your set-top box for 5 to 10 seconds, until your device reboots.
Option 2: Disconnect and then reconnect the power cable from the set-top box.
If restarting your system doesn’t upgrade your user interface, call us at 1–866-44-TDSTV. You can also find more information in our online User Guide.
We hope you enjoy these new updates as much as our testers have!
When browsing other channels or looking at your info screen, the time allowed to read what is on the screen should be increased before it resets back to the channel you were previously watching. The time should be doubled at the least. Not everyone is a speed reader! This should apply to all applications. Also, it would be nice to be given advance notice of a scheduled change to the TDSTV user interface such as just occurred instead of leaving your customer in a lurch when they turn on the television not knowing of a change. The statement on the above announcement stating “remote will still work the same as before” is incorrect. You can not use the right browse button to look at other channels and for days forward to record a program. Now it shows the next four programs for that channel and no more.
James, thanks for the feedback. We did email customers about the new interface and also over social media. If you didn’t receive an email from us, we certainly apologize. And, we’ll certainly correct the blog to not overstate the remote’s functionality. Thank you!
Not a fan of the new interface at all. The fonts are much smaller than before and difficult to read, even on our 65 in TV. The channel logos are also very small, making many difficult to recognize. The Browse panel and Last Channel panel take up too much room on the screen. The green bar when you’re watching a recording is just ugly. All of it is just too busy and distracting.
Melanie, we’re sorry to hear you’re not enjoying the new interface. The new look is Mediaroom’s latest update and it will allow us to roll out a great new feature coming in the next month or so. I’m not sure I know what you mean by “green bar when you’re watching a recording,” but it certainly doesn’t sound right. Please do call in to our customer service team so they troubleshoot with you (1-888-225-5837).
Do not like this at all! cannot figure out how to get my favorites on the channel line up it keeps reverting back to all.channels
Dawn, I’m sorry you’re finding the change challenging. Have you tried to download the new User Guide? The information I suspect you’re looking is on page 42. If that doesn’t help, please don’t hesitate to reach out to our customer service teams by calling 1-888-225-5837 (and online chat is also available). –Missy
Where do I find how much DVR free space I have. It seems to have disappeared since the update.
Hi David,
I had to look that one up! I haven’t taken a peek since my upgrade 🙂 According to the User Guide it’s still there. It says:
1. Press MENU button or the LEFT arrow on your remote and navigate to the Recorded TV section of the main menu.
2. Use the DOWN ARROW to navigate to the DVR Free Space option and press OK on your remote.
A screen will appear with a pie chart showing how much storage space is available (and the approximate recording hour equivalents for SD and HD programs).
If you have any other questions, check out all of the resources we have online, or you can always call in to speak with someone if that’s what you would prefer (1-888-225-5837).